Have At It: Sticky Buns

When we decided to move to Seattle in the middle of 2014, I was bummed that it meant I probably wouldn’t meet my goal of cooking with my dad at least twelve times before the year was over. I’d been having a lot of fun learning how to make some of the things my dad makes that I love most, and I’d really been enjoying collecting my dad’s stories. Plus, you know how I feel about goals and failure.  

Our year in Seattle was really hard in some ways, not least of which was feeling so far from my family. I had never lived outside of Colorado, and I’d always been in a pretty consistent rhythm of seeing my parents and siblings regularly. I missed them a lot, especially in the earliest days of my pregnancy.

My mom and dad made it work to fly to Seattle and spend five days with us after Abe was born, and they were some of the sweetest days of my life so far. Partly because my mom did all of our laundry and my dad cooked us three meals every day, but mostly because it took me by surprise how incredible it felt to see them love my baby the way they did, they way they do. They held him and sang to him and changed his diapers, and I wept uncontrollably the day they left.

Just a few weeks later, we made the move back to Denver with our boy. It’s taken me a little while to make plans for cooking with my dad again, but I’ve had these last two recipes in mind since before we even decided to move away. I've been so excited just thinking about sharing this with you. Christmastime has always been special for my family, and this recipe has long been a Christmas morning staple. You know, the thing you snack on with your coffee while you wait for the main event breakfast/brunch? You know.

My dad told me he thinks this recipe came from one of my aunts, but he couldn’t remember for sure. I’m certain there are endless versions of sticky buns out there, but I feel confident that these are the only ones I’ll ever make. They taste like my childhood and Christmas. Plus they’re SO quick and easy, there’s kind of no reason not to make them (unless you don't eat gluten or sugar or dairy). You still have time to pick up all the ingredients and prep them for this year's Thanksgiving morning, in fact. You could eat them while you watch the Macy's Parade!

Sticky Buns

Ingredients:

1 three ounce box of vanilla JELL-O cook & serve 

8 tablespoons (1 stick) of butter

3/4 cup of brown sugar

1 teaspoon of cinnamon

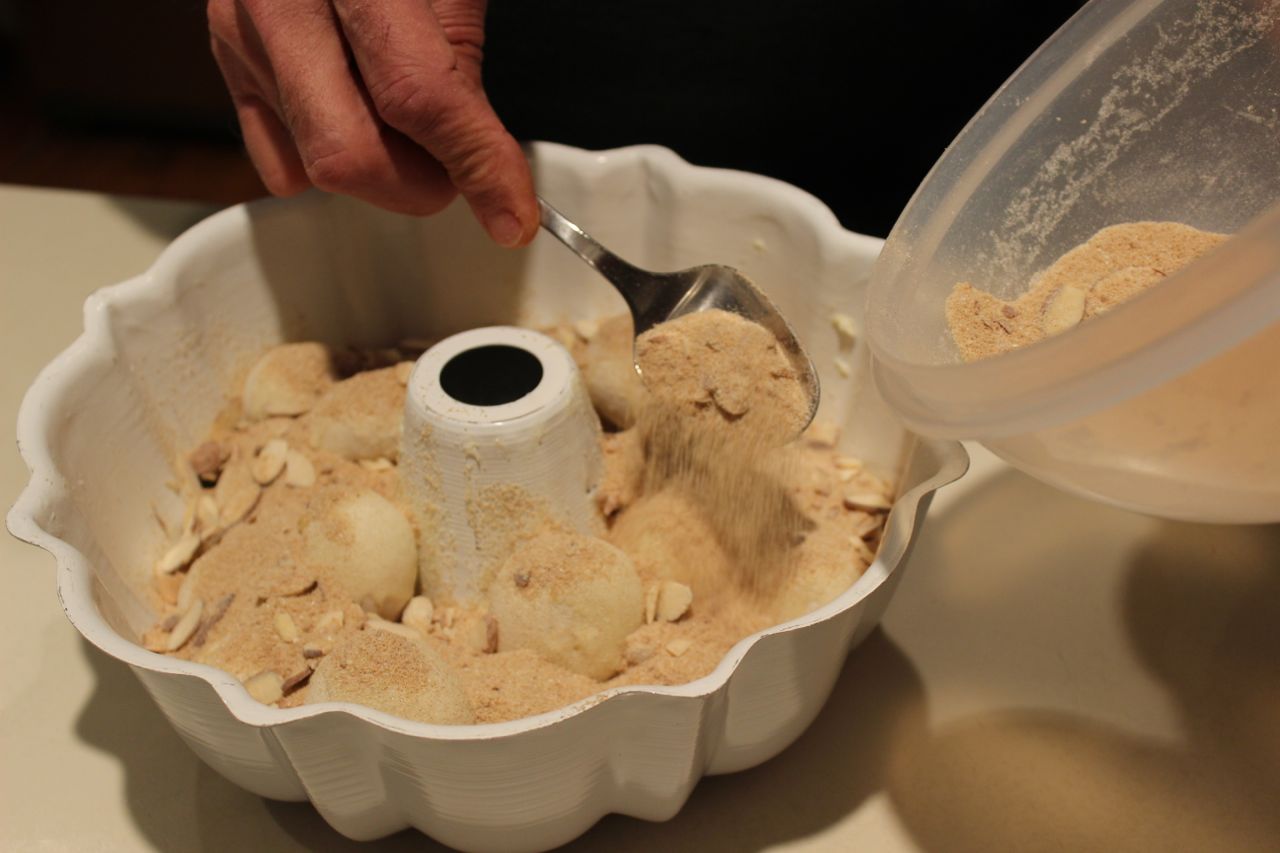
1/2 cup of sliced almonds (if you like nuts in your baked goods)

20 small white Rhodes dinner rolls

Directions:

1. In a small mixing bowl, stir together the cook & serve, brown sugar, and cinnamon.

2. Grease a bundt pan with the stick of butter, then melt the remaining butter and find a plate/platter big enough to cover the top of your bundt pan. You'll need it when you pull them out of the oven.

3. Arrange the frozen rolls in the bundt pan, making sure to count out exactly 20.

4. Drizzle the butter over the top of the frozen rolls, making sure to coat the tops of all the rolls. Also make note of the melted butter pooled at the bottom of the bundt pan - it will be HOT later.

5. Sprinkle the dry ingredients over the rolls, then cover with a paper towel and let rise overnight. Placing a cookie sheet underneath the bundt pan will help catch the sprinkles of dry ingredients that would otherwise spill all over your counter/floor/refrigerator. (My dad recommends placing the whole deal on top of your refrigerator because he thinks the heat from the motor helps the rolls rise. It worked for me.)

6. Preheat your oven to 350 before making your morning coffee. When it’s warm, slide your bundt pan/cookie sheet combo in for 30 minutes. You want the tops of the rolls to be a nice, golden brown on top.

7. As soon as you pull the pan out of the oven, cover it with your plate/platter and flip the sticky buns out of the bundt pan. Be careful not to burn yourself with the hot butter, and be prepared to dirty your oven mitt/towel/whatever you use to take hot dishes out of the oven.

8. Use a spatula to clear all of the sticky butter/sugar out of the bottom of the bundt pan and drizzle over the top of your sticky buns. 

9. Make some more coffee and get ready to party!

One of my goals for 2014 was to write one “Have At It” post per month, to include a story from my dad’s life with one of his recipes. I figured if nothing else, it would give me some motivation to get serious about getting my dad’s stories down, even if I had to write them myself. I only got ten recipes down in 2014, due to moving out of state and birthing my first child, so I'm finishing up the last two now in November and December, 2015. 

Previous Have At It Posts:

Homemade Pickles

Garlic Cheese Bread + Croutons

Chicken Caesar Salad

Reese's Rice Krispie Treats

Tacos and Salsa

Dutchbabies

Bean Dip Poppers

Goldrush Cookies

Have At It: Homemade Pickles

When my dad picked me up from the airport last time I was in Denver, I was hungry. I'd arrived at the airport here in Seattle with what I thought was more than enough time to get some breakfast before my flight left but, as I discovered when the TSA agent at the front of the security line pointed it out, my boarding pass had my maiden name on it and the only thing in my wallet that said Jenny Loyd was my Denver Library card. The nice people at United airlines helped me out, but I ended up running through the terminal to catch my flight.    

My dad had a bunch of food in his car - all the things I'd asked him and my mom to have on hand when I visited, so he had something to offer me. I ended up asking for a trip to the chick-fil-a drive through, because it was one of the things I'd been craving like crazy. On that ride from the airport, my dad filled me in on his newest kitchen hobby - making pickles.

We waited until the day I was leaving to make and photograph the pickles, but we didn't end up with any real time for me to get a story out of my dad. I decided at the last minute that I wanted my mom and dad to take me to see Denver's new Union Station on our way to the airport, so my dad threw these pickles together in about 30 minutes while I packed up my bags. I snapped a few pictures and we were off.  

We strolled around the pretty new train station, took a couple of photos, and then my parents drove me out to DIA. (There was a crazy traffic jam on I-70, which I thought was going to make me miss my flight. It was a Saturday night, though, and there was NO ONE at the airport. I even got to go through the pre-check line. I highly recommend flying on Saturday nights.)

I've definitely been eating more pickles than usual since I've been pregnant, and these puppies are a pretty delicious version. Plus they're so easy! Make some. You won't be disappointed.

Pickles

Ingredients:

1.5 quarts of distilled water

1/4 cup of canning salt

2 cups of apple cider vinegar

1 tablespoon of mustard seed

24 pickling cucumbers, washed

4-8 sprigs of fresh dill

16 cloves of garlic

1 jalapeno, sliced, if you want slightly spicy pickles

4 32 oz. mason jars

Directions:

1. Combine the water, canning salt, apple cider vinegar, and mustard seed, and bring to a boil.

2. Place a sprig of fresh dill and 2 cloves of garlic in the bottom of each jar.

3. Add 6 cucumbers (and a slice of jalapeno, if you want) to each jar.

4. Add another sprig of dill and 2 more garlic cloves on top of the cucumbers.

5. Fill each jar with the boiled liquid mix, then leave jars uncovered (maybe lay a towel over the top) on the counter for 3 days.

6. Refrigerate, then enjoy!

One of my goals for 2014 is to write one “Have At It” post per month, to include a story from my dad’s life with one of his recipes. I figure if nothing else, it will give me some motivation to get serious about getting my dad’s stories down, even if I have to write them myself. 

Previous Have At It Posts:

Garlic Cheese Bread + Croutons

Chicken Caesar Salad

Reese's Rice Krispie Treats

Tacos and Salsa

Dutchbabies

Bean Dip Poppers

Goldrush Cookies

Have At It: Garlic Cheese Bread + Croutons

My dad is a weeper.

I’m not sure when it started, but for as long as I can remember he’s been the kind of guy who gets teary over everything from the moment the bus driver moved the bus at the end of Extreme Makeover: Home Edition to the moment he first heard the news that he was going to be a grandpa. It’s one of my favorite things about him: that he’s not afraid to wear his heart on his sleeve.

I’ve been saving these two recipes for August because it’s the month of my birth and I sort of feel like if you’re going to eat this much bread and butter and cheese in one sitting, it better be because you’re celebrating something major. My dad always makes these croutons and this bread with his chicken caesar salad, and for most of my life this meal was what I requested for my birthday dinner.

When my siblings and I were kids, my parents always made sure that our birthdays were extra special occasions. Every year, first thing in the morning, there were gifts and a birthday card on the kitchen table and most years there were parties with cake and ice cream and family and friends. We weren't rich, but my mom and dad always made sure that birthdays felt like celebrations.

One year - I was eight or nine - we took a summertime family vacation to Breckenridge, where I fell in love with a pair of teddy bears in a souvenir shop. They were dressed as a bride and groom, and grossly overpriced. I pleaded to have both, but my parents said no. They told me to choose just one, because that was all we could afford. I picked the bride because she was prettier, but I just knew she would be lonely.

When my birthday rolled around later that summer, the one gift I remember opening was the teddy bear groom, which my mom had snuck back to the shop to buy. I was so excited when I realized what it was, my overjoyed reaction brought tears to my dad's eyes. I can still remember how special I felt.

Croutons

Ingredients:

1/4 cup of butter, melted

1/4 cup of olive oil

Minced garlic to taste (1-2 cloves)

1 loaf of dense bread like sourdough (day-old is best), chopped into 1 inch cubes

1/4 cup of grated parmesan cheese

Garlic salt to taste

Seasoned salt to taste

Directions:

1. Combine the butter, oil, and minced garlic.

2. Pour half of the butter mixture over the bread and toss it, then pour the other half and toss it again.

2. Coat the bread in parmesan cheese and toss it again.

3. Coat the bread in paprika and toss it again.

4. Season the bread with garlic salt and seasoned salt and toss it one last time.

5. Spread the bread into an even layer on a baking sheet and bake at 275-300 for 90-120 minutes. According to my dad: "The idea is to dry em out and brown em." So that's what you're looking for.


Garlic Cheese Bread 

Ingredients:

1 stick of butter, melted

2 cloves of minced garlic

1 loaf of French or sourdough bread, sliced in half lengthwise

1 cup of shredded sharp cheddar cheese

1 cup of shredded Monterrey Jack cheese

Butter it and bake at 300 for 15 min

Directions

1) Mix the butter and garlic, cover it, and refrigerate overnight.

2) Butter both sides of the bread and bake it at 300 for 15 minutes.

3) Mix the two cheeses together and sprinkle on the bread, making sure to go all the way to the edges.

4) Put the bread back in the oven for 15 more minutes. The cheese should bubble, but not get brown.

5) Let the bread sit for at least 5-10 minutes before slicing it. According to my dad: "It'll just goo apart if you try to cut it right away." (I believe "goo apart" is a term borrowed from the French.)  

One of my goals for 2014 is to write one “Have At It” post per month, to include a story from my dad’s life with one of his recipes. I figure if nothing else, it will give me some motivation to get serious about getting my dad’s stories down, even if I have to write them myself. 

Previous Have At It Posts:

Chicken Caesar Salad

Reese's Rice Krispie Treats

Tacos and Salsa

Dutchbabies

Bean Dip Poppers

Goldrush Cookies

Have At It: Chicken Caesar Salad

Since it’s summertime, I figure now is probably a good time to share my dad’s most popular salad recipe. For as long as I can remember, chicken caesar salad as a meal has been a major even at my parents’ house, intended for celebrations and big family get-togethers. It was the meal I requested for my birthday dinner every year when I was growing up - and most years since, too. My birthday is next month, so I’ll wait until then to share the my dad’s recipes for homemade croutons and the cheesy garlic bread he pairs with this salad. There will be a lot of butter involved.

According to my dad, a man named Glen Coffey first taught him how to make a traditional caesar salad when he was 14 or 15 years old. Glen Coffey and his wife were best friends with my dad’s folks, the sort of friends who took family camping trips together in the summertime and taught each other’s kids how to cook. Until I started asking him about it, I had no idea my dad had been making caesar salad for 75% of his life. 

It will come as no surprise, though, that my dad also once had a job as the captain of a team of food service professionals at a restaurant called Rafael’s, where he made caesar salads table side for his customers. He worked that job in addition to a regular 9 to 5 when I was a kid, but I have zero recollection of it. He told me about it over the phone last night as though it were something I should remember, but I think I was just too small. It’s consistent with what I’ve always known about my dad’s work ethic, though; he was never above doing any job to take care of his family, and I’ve always respected him for it. He’s a good dad.    

Chicken Caesar Salad

Chicken (this marinade recipe is actually from my mom’s mom and my tiny baby niece's namesake, Vera Forte)

Ingredients:

6 boneless skinless chicken breasts

1/2 cup of vegetable oil

1/2 cup of lemon juice

1/4 cup of water

2 teaspoons of salt

1/4 teaspoon of pepper

1 tablespoon of sugar

1 teaspoon of paprika

1 tablespoon of minced onion

Directions: 

1) Mix everything but the chicken together to combine, then add the chicken and marinate for at least 4 hours.

2) Grill the chicken, then slice it up for topping the salad.

Salad

Ingredients:

2 heads of romaine lettuce cleaned and broken by hand - don’t cut it

1/4 cup of grated Parmesan

2/3 cup of olive oil 

1/3 cup of red wine vinegar 

1.5 inch squeeze of anchovy paste (Or if you really want to get fancy, mush anchovies in olive oil to make the paste yourself like my dad did when he was the team captain at Rafael's.)

1 clove of minced garlic

A "pfst" (pretty sure this is the same as a dash) of lemon juice

Directions: 

1) Combine everything but the lettuce and parmesan in a jar with a lid that screws on. Shake it an hour before dressing the salad, then several times before serving.

2) Sprinkle the parmesan over the lettuce.

3) Pour the dressing over the lettuce and toss it together.

4) Coddle an egg. My dad does this by placing an egg in a mug, running it under hot water for 3-5 minutes (of course, he just instinctively "knows" when it's done). The goal is to get the inside of the egg warm and sticky, then separate it and keep the yolk.

5) Beat the egg yolk, drizzle it over the salad, then toss the salad again.

6) Plate it up, throw some chicken in the mix, and eat yourself silly. It's salad. It's good for you.

One of my goals for 2014 is to write one “Have At It” post per month, to include a story from my dad’s life with one of his recipes. I figure if nothing else, it will give me some motivation to get serious about getting my dad’s stories down, even if I have to write them myself. 

Previous Have At It Posts:

Reese's Rice Krispie Treats

Tacos and Salsa

Dutchbabies

Bean Dip Poppers

Goldrush Cookies

Have At It: Reese's Rice Krispie Treats

When I set out to write about one of my dad's recipes every month for one year, I didn't know we'd be moving to Seattle halfway through the year. I figured I'd be at my mom and dad's house at least once a month on a weekend, that I could just ask my dad ahead of time to fix something and be sure to remember my camera.

So I found myself scrambling during my last couple of weeks in Denver, trying to fit cooking with my dad into a busy schedule of packing, finishing up the school year, and spending time with friends before the move. Luckily, these treats take approximately 10 minutes to whip up, so we were able to pull them off the night before we left for San Francisco. Unfortunately, I didn't really get a story from my dad while he made them.

I can tell you, though, that I remember thinking that my dad was the cleverest person I'd ever met the first time he made these for us. I believe the whole thing may have started with an incident that involved me ruining a saucepan by burning butter and marshmallows into the bottom of it but, really, who can be sure? What I remember is my dad asking: "Do you like Reese's Peanut Butter Cups?", then proceeding to make my head explode with the new understanding that one can, in fact, improvise changes to an existing recipe and make something even more delicious.

My dad's always been good at creative problem-solving, and I remember one of his sisters telling me once - when I was a very small child - that one of her favorite things about my dad was that he seemed to be good at everything he tried. Now that I'm grown, I know enough to know not to be surprised when my dad comes up with something like Reese's Rice Krispie Treats, but back when I was a kid and feeling like a dummy for screwing up melted butter, I was amazed at his ingenuity. Then and now, I've always been glad he was my dad. 

Reese's Rice Krispie Treats

Ingredients:

3 tablespoons of butter

1 10 oz package of small marshmallows

1/4 cup of crunchy peanut butter

5 cups of Cocoa Krispies

Directions: 

1) Grease a 9 x 13 pan.

2) Melt the butter. The official recipe says to do this in a saucepan on the stovetop. My dad did it in the microwave because he's a daredevil.

3) Add the marshmallows and stir until they're completely melted. (Note: should you choose to use the microwave like my dad did, you will have to stir very quickly since your only source of heat will be the butter itself. My dad pulled it off, but I'm not sure I could have.) 

4) Add the peanut butter and Cocoa Krispies and stir until everything is combined.

5) Press the mixture evenly into the pan and let it cool.

6) Cut into square-shaped treats and eat at least one or two before your brothers and sisters find out they're done. 

One of my goals for 2014 is to write one “Have At It” post per month, to include a story from my dad’s life with one of his recipes. I figure if nothing else, it will give me some motivation to get serious about getting my dad’s stories down, even if I have to write them myself. 

Previous Have At It Posts:

Tacos and Salsa

Dutchbabies

Bean Dip Poppers

Goldrush Cookies

Have At It: Tacos and Salsa

One of the first things I ever tried cooking on my own was tacos. I think once I realized that all I really had to do was brown and season some meat and chop a few things, I decided tacos were something I could probably pull off. My dad has always made the BEST tacos I've ever eaten, and for the longest time I was convinced it was because he fries the tortillas before serving them.

I had my dad coach me through frying tortillas over the phone one time, shortly after college, and once I got the hang of it I felt like a total badass. I think I invited everyone I knew over for tacos because I thought I was just as good as my dad at making them.

And yet.

The meat I cook for tacos has never been quite as good as my dad's, and I never questioned why. I sort of just assumed he was better at cooking it than me, and that one day after years and years of experience, my taco meat would magically start tasting as good as his.

Then my sister told me he adds not only taco seasoning, but also SOY SAUCE AND KETCHUP to his taco meat, and it nearly made my head explode. Why had he never mentioned this? Why had I never asked? Where on earth do you get such a wacky idea? And good Lord, how does that combination make the stuff taste so damn good?

When I went to my mom and dad's house last week to help my dad cook tacos and take these photos, my dad notified me that he had confirmed a reservation at Far Niente for all of us on the day we arrive in San Francisco to celebrate his 60th birthday. He's been telling me such good stories about growing up in the Bay Area since I was there a year ago and started asking, and I'm so glad we're going to get to hear even more of them when we're there next month. It's likely that at the end of that trip, Dann and I will fly to Seattle, where we'll settle in to a new home in a new city. Luckily I'll have my dad's taco recipe with me so, on a day when I really need it, I can eat something that tastes like home.

In the spirit of Cinco de Mayo, I'm sharing my dad's salsa recipe today too. I didn't have a chance to post one of his recipes in April, so I'm playing a little catch up. Enjoy!

Tacos

Ingredients:

2 lbs ground beef

1 packet Lawry's taco seasoning

2/3 cup ketchup

2.5 tablespoons soy sauce (Note: my dad measured the ketchup and soy sauce for the first time when I was there to document this recipe last week. Until then, he always decided he'd added enough of each based on how the meat SMELLED.)

Yellow corn tortillas

Chopped iceberg lettuce

Diced tomato

Black olives

Shredded cheddar cheese

Sliced avocado

Salsa

Sour cream

Directions: 

1) Cook the meat according to the directions on the seasoning package, knowing that you have twice as much meat as it calls for. The key is twice as much meat as the seasoning package calls for.

2) Add soy sauce and ketchup, then let the meat cook for another 20 minutes.

3) Fry tortillas one at a time in very hot oil.

4) Fill tortillas with meat, cheese, and whatever other toppings your heart desires.

Salsa

Ingredients:

1 28 oz can of crushed tomatoes

1 14 oz can of diced green chiles

3 green onions, sliced, including tops

1/2 teaspoon of garlic salt

1/2 teaspoon of salt, plus added salt to taste

Directions:

1) Combine ingredients in a bowl and refrigerate overnight.

2) Get a bag of tortilla chips and a Corona and call it dinner. 

One of my goals for 2014 is to write one “Have At It” post per month, to include a story from my dad’s life with one of his recipes. I figure if nothing else, it will give me some motivation to get serious about getting my dad’s stories down, even if I have to write them myself. 

Previous Have At It Posts:

Dutchbabies

Bean Dip Poppers

Goldrush Cookies

Have At It: Dutch Babies

For as long as I can remember, my dad’s been cooking Dutch Babies as a special breakfast treat on weekend mornings. I can remember, as a kid, feeling amazed at how high the edges of the giant pancake had grown when my dad pulled the skillet out of the oven. It seemed like magic.

For as long as I can remember, my dad’s also been a basketball coach. He started coaching my older brother’s team when we were kids, and though he’s had a few years here and there when he didn’t coach at all, he’s always been a loyal supporter (and yes, sometimes a crazy screaming fan) of the teams at the high school my siblings and I all graduated from. For the last couple of years he’s been coaching the JV team there, and when the Varsity made it to the third round of the playoffs this season, he was thrilled. It was fun for me, as his kid, to witness his excitement on behalf of a bunch of teenage kids I didn’t know. 

The morning after the team got its last win of the season, I woke up at my parents’ house and my dad was getting ready to make Dutch Babies. He was mostly doing it because I asked him to, but it felt a little bit like a special celebration of the victory. One thing my dad loves to do is talk about all the ins and outs of a sports team he follows, and he had a lot to say about how the team played and what they would need to do to prepare for - and win - the next game. I got excited to see them play again just listening to him. 

On that Saturday a couple of weeks ago when my dad made Dutch Babies (and bacon, duh), he also told me all about how he was friends and roommates with Tom Baack back in the day before he married my mom. After his stint as an athletic trainer at Stanford, he and Baack worked with the basketball team at Green Mountain High School when it first opened in 1975.   

When I was in sixth grade, my dad asked if I’d like to be in charge of “the book” for my brother’s basketball team during their games. I figured it would give me something to do during the games, plus I totally had a crush on some of the players and wanted them to take me seriously, so I agreed. I learned very quickly why keeping track of team fouls is just as important - if not more so - as counting individual fouls. What really happened was I got screamed at by a middle school rec basketball league referee for not knowing what he was asking for, and my dad stepped in to defend me and teach me something that takes, like, 10 seconds to explain. And then I got really good at knowing the rules of basketball and keeping track of statistics and basketball has been my favorite sport ever since.

Now that he and my mom are empty-nesters, I suspect my dad will continue to coach and find ways to step into the lives of young people, teaching and guiding them the way he did for my siblings and me, the way he's done for countless young athletes over the years. He's good at it, and from what I can tell he's having a blast. I'm proud of my dad and I hope he can keep doing things like coaching basketball for years to come. Just as long as he's still available to cook me up an occasional Dutch Baby on the weekend.  

Dutch Babies

Ingredients:

6 eggs

1/2 cup of butter 

1 1/2 cups of milk

1 1/2 cups of flour

Directions:

1) Preheat your oven to 425.

2) Put the butter in a 4.5-5 quart frying pan and set it in the oven. 

3) Put the eggs in a blender and mix at high speed for 1 minute.

4) With the blender still running, gradually pour in the milk, then slowly add the flour. Continue blending for another 30 seconds.

5) Remove the pan from the oven and pour the blended batter into the hot melted butter.

6) Return the pan to the oven and bake until the Dutch Baby is puffy and well-browned, about 20-25 minutes.

7) Slice it up like a pizza and serve it immediately with fresh lemon juice and powdered sugar. And also with some extra crispy bacon. You know, if you consider yourself an American.

One of my goals for 2014 is to write one “Have At It” post per month, to include a story from my dad’s life with one of his recipes. I figure if nothing else, it will give me some motivation to get serious about getting my dad’s stories down, even if I have to write them myself. 

Previous Have At It Posts:

Bean Dip Poppers

Goldrush Cookies

Have At It: Bean Dip Poppers

I used to think my dad was friends with Dan Reeves. From the way he talked to the TV during Broncos games, I figured they were buddies. I imagined them meeting for lunch during the work week and occasionally going out for a beer. Reeves took over as head coach of the Broncos the same year I was born, and by then my dad was a committed Broncos fan. I didn’t know until this past Sunday that my dad (who grew up in the Bay Area) was a 49ers fan as a kid and even a Raiders fan for a bit before he moved to Denver. For as long as I’ve known him, he’s been a faithful Broncos fan, no matter how good or bad the team is. 

My dad at Super Bowl XXII in San Diego. Please make note of his 3/4 sleeves and stonewashed, pleated jeans.

When we showed up at my parents’ house for the game on Sunday, my dad had a batch of his famous salsa chilling in the fridge, a pot of jambalaya on the stove, and the fixings for buffalo chicken dip all ready to be tossed together. My favorite thing he was working on, though, were these treats I’ve named “Bean Dip Poppers”. I can remember eating these for as long as I can remember knowing my dad loves the Broncos, and they are delicious.

While he worked in the kitchen and I rifled through the trash looking for the lid to the bean dip can so my photos would look good, I asked my dad to tell me the story of his life as a Bronco fan. It goes back to his days as a visiting student athletic trainer at Stanford. My dad was a student at Cal State Hayward (now known as CSU East Bay) when some football coaches he’d known in high school recommended him as a student trainer to cover an open position for part of the summer at Stanford. Apparently someone had missed the fact that the incoming freshmen trainers wouldn’t be arriving on campus early enough to be there when football started, so my dad got to fill in and work (as much as a student trainer does with a head coach) with John Ralston, who would later become the head coach of the Broncos.

According to my dad, Stanford was one of only a few schools that had a degree program in athletic training at the time and, had he stayed in California, he would have applied and likely gotten in.

Instead, he joined a band and hit the road.

My dad and his siblings were a touring band for a number of years in the 70s, and the music is what ultimately led my mom and dad to meet each other. Once the band settled in Denver (after doing things like USO tours in Europe), they had a standing gig at the restaurant where my mom worked as a server, and the rest is the history that explains my existence.

When I asked my dad if he remembered when he officially became a Broncos fan, he told me he and my mom got to go to a number of the home games when they were dating because my mom’s parents had season tickets. That, coupled with the fact that John Ralston (who he'd worked with at Stanford) was the coach, made him take an interest in his new hometown team.

One of my favorite things about my dad’s history as a Broncos fan is that he and his band recorded a song with former Bronco John Keyworth in 1977. Legend has it that during the 1977 AFC Championship pre-game show, NBC aired a live performance of the song at Keyworth’s restaurant, and my mom and her sister were in the audience. I tried contacting NBC Sports to ask if they have video proof of this event, but no one got back to me. When I was a kid, my dad would play the 45 of ‘Make Those Miracles Happen’ over and over for me and my siblings. He had us convinced that if we believed in miracles and wiggled our noses when the song ended, the record would magically start playing again. We were too young to realize his record player had a “repeat” function.

And as tough as it was to watch the Super Bowl last weekend, I hoped for a miracle all the way to the end. I’m sure some part of my nature that believes in miracles could be attributed to my dad’s record player trickery when I was a small, impressionable child. But even now that I’m a grown-up with a complete understanding of the record player’s repeat function, my dad’s still able to guide me, to give me perspective. When I said I felt like I might want to stay in bed all day on Monday and asked him if he felt sad, he said “Nah, there’s no reason to be sad. The sun’ll come up tomorrow.” 

Bean Dip Poppers

Ingredients:

1 can Frito’s Original Flavor Bean Dip

1 tablespoon worcestershire sauce

1 clove garlic, minced

Juice from 1/2 of a lemon

1 bag of Fritos Scoops Corn Chips

1 cup shredded cheddar cheese

Directions:

1) In a small bowl, mix the worcestershire sauce, garlic, and lemon into the bean dip.

2) Spoon dip into chips, then place them onto a foil-lined baking sheet. Sprinkle cheese over the top of each chip. 

3) Broil the chips for a few minutes, until the cheese is melted. Let cool long enough to avoid burning your mouth. Enjoy!


One of my goals for 2014 is to write one “Have At It” post per month, to include a story from my dad’s life with one of his recipes. I figure if nothing else, it will give me some motivation to get serious about getting my dad’s stories down, even if I have to write them myself. 

Previous Have At It Posts:

Goldrush Cookies

Have At It: Goldrush Cookies

When Patty Griffin’s American Kid came out last May, I was getting ready to hit the road with the band for a three week tour of the west coast. I played that album from start to finish at least once during each of my van-driving shifts, and I loved it more with every listen. Sure, that’s to be expected with me and any Patty Griffin record, but there was something especially poignant about the story behind these particular songs. I had heard her talk about the record a few months prior when she was in Denver, and she explained that she wrote most of them as a way of dealing with the death of her father. I would be lying if I said I wasn't weeping at the wheel as we made our way through Wyoming.

My own dad has never been one to treat his mortality with any sense of delicacy. For as long as I can remember, he’s been pretty candid when talking about what he wants from life, knowing that one day he’s going to die. I tried asking him over a year ago to write his life story down for me so I could have it when he’s gone, but I'm pretty sure he never started. He’s more of a verbal storyteller, I think.

One thing my dad has always been good at it is food. He was the one who typically did the grocery shopping for our family of seven (I think because he probably cherished the time to himself on a Saturday morning) and he just loves to cook. I think he finds great joy in feeding his family, too, which has only gotten more fun as we’ve grown older. At age 32, I can show up at my parents’ house and tell him I’m hungry and - as long as it’s not in the middle of a Broncos game - he’ll stop what he’s doing and whip up a gourmet BLT. 

During that tour of the west coast last May, I started dreaming about what it would take to write a cookbook with my dad. You know, the story of his life paired with his original recipes, all so I can have something to hold on to when he’s gone? I’d been tossing around ideas for the title of the nonexistent cookbook when we found ourselves at Fenton’s, under a blazing sun, getting ready to have lunch. As our “your table’s ready” buzzer went off, a stranger who was also waiting for a table asked if we’d like to take the only unoccupied seats underneath an umbrella. Since we were on our way inside, I looked at him squarely and said “Have at it”, which is a phrase I’m pretty sure I have only ever heard my dad say, and am certain I had never said myself before that moment. And there it was.

So I’m going to try something new here this year. I set a goal of one “Have At It” post per month, to include a story from my dad’s life with one of his recipes. I figure if nothing else, it will give me some motivation to get serious about getting my dad’s stories down, even if I have to write them myself. And who knows? Maybe if it’s a roaring success, I’ll actually try writing a cookbook when the year is over.

Because of his forthright attitude about savoring life while he’s still here to live it, my dad doesn’t concern himself with healthy eating, per se. I think his main concern when it comes to food is that it be enjoyable. Sometimes that means he cooks with a lot of fresh, seasonal produce - because what’s more enjoyable than that? But sometimes it means he cooks with a lot of salty, fatty, creamy ingredients too - because perhaps sometimes they are more enjoyable than fresh, seasonal produce. This recipe is actually from my mom’s mom, but it’s the first thing I can remember my dad teaching me to make. I think of him teaching me to drizzle the condensed milk like I think of him teaching me how to vacuum carpet - making sure to get all the way to the corners and not to miss any spots. Because “if you do it right the first time, you won’t have to do it again”. 

Vera's Goldrush Cookies

Ingredients:

1/4 cup butter

1 cup graham cracker crumbs

1 1/2 cups sweetened shredded coconut

1 cup semi-sweet chocolate chips

1 cup chopped pecans

1 14 oz can Eagle Brand (sweetened condensend) milk

Directions:

1) Preheat the oven to 350 degrees. Melt the butter in a 9x9 pan (in the preheated oven). Mix graham cracker crumbs into the melted butter. Press down the crust until it evenly covers the bottom of the pan.

2) Sprinkle on coconut. Sprinkle on chocolate chips. Sprinkle on chopped pecans. Drizzle Eagle Brand milk over the entire pan, making sure to get all the way to the corners and not to miss any spots. Top with a little more coconut.

3) Bake for 30 minutes or until top is light to medium brown. The liquid kind of bubbles when they are done. Cool, then refrigerate. Remove from refrigerator and let thaw for 5-10 minutes before cutting into squares. Enjoy!

Homemade Home Run Pies

Have you ever had a Home Run Pie?

I used to LOVE them.

When we were kids, my siblings and I used to get them whenever we had a snow day. That’s how I remember it, anyway. For me the tradition solidified in college, when I started doing my own grocery shopping. A pre-snowstorm trip to the the grocery store always included picking up a Home Run Pie. Or two.

I’m not sure when or why Horizon Food Group stopped making Home Run Pies, but I feel a slight hint of sadness at not being able to get one when I make an emergency grocery store run just before an impending blizzard. (Horizon Food Group does seem to have replaced Home Run Pies with “Cutie Pies”, which boast of being made with real fruit and whole grain wheat, though they contain partially hydrogenated oil. Also, the only store that carries them is Wal-Mart.)

So a couple of weekends ago, when we were hit with a foot of snow, I decided it was time to try making something like a Home Run Pie from scratch. I started with this recipe and figured I could count this as the first toward my bucket list goal of making 100 different kinds of pie.

Although they don’t taste quite like I remember Home Run Pies tasting, I’d say they turned out rather well (and no doubt one zillion times healthier). And since I’m committed to perfecting the sugary glaze on the outside of the pies, I may just make some more this weekend. We are supposed to get nine inches of snow tomorrow, after all.     

Homemade Home Run Pies Recipe (modified from spoon fork bacon):

  1. Preheat oven to 400°F.
  2. In a bowl sift together 2 cups all-purpose flour, 1/4 teaspoon baking powder and 1/4 teaspoon salt.
  3. Add 3/4 cup cold unsalted butter, cut into cubes, and 1/4 cup cold cream cheese, cut into cubes, then cut in with a pastry knife or your fingers until a fine crumble is made.
  4. Add 2 tablespoons buttermilk and gently work together, until a dough just comes together.
  5. Form the dough into a disc, wrap it in plastic wrap and place in the refrigerator for 25-30 minutes.
  6. Roll the dough out onto a lightly floured surface until ¼ inch thick.
  7. Cut twelve 4 inch circles from the dough and fill each with a small amount of cherry pie filling (you can make the filling from scratch when cherries are in season - but we’re making snow day treats, here).
  8. Whisk together 1 egg and 1 tablespoon heavy cream.
  9. Brush the perimeter of each pie with the egg wash and fold/pinch together, creating ½ circles.
  10. Press the ends with the back of a fork to seal and brush the tops with the egg wash.
  11. Using a pairing knife, cut 3 small slits on the tops of each pie.
  12. Place them onto a parchment lined baking sheet and bake in the oven for 15 to 18 minutes or until golden brown.
  13. Allow the pies to cool completely on a cooling rack.
  14. While the pies cool, place 1/4 cup powdered sugar, 2 tablespoons heavy cream, and 3/4 teaspoon vanilla extract into a small bowl and gently stir together with a fork until fully incorporated and smooth.
  15. Using a pastry brush, spread the icing over the top of each pie.
  16. Enjoy!

Cranberry Orange Buttermilk Scones

Did you know what a scone was before you ever bought one at a Starbucks?

I did not.

And I certainly never imagined myself the type of person who would a) learn to make a scone from scratch, b) enjoy it thoroughly, c) become the person my whole family counts on to make scones every year at Christmas.

However, there is hope for us all. My dad's dad's sister, known to my family as Auntie Chris, came from out of town to celebrate Christmas with us years ago and baked her buttermilk scones multiple times while she was here. They were a hit. The following year I asked her for the recipe since I knew she wouldn't be coming to Colorado, and I figured I could probably follow instructions well enough to make a decent scone.

Nearly ten years later, I'd say I've mastered that bad boy. 

So today I'm sharing the recipe and some photos of my scone-crafting process step-by-step, in hopes that I can encourage anyone else out there who believes that a scone can only ever be purchased from a Starbucks pastry case. Like I said, there is hope for us all.

Auntie Chris' Cranberry Orange Buttermilk Scones

1) In a large bowl, mix together:

  • 2 cups flour
  • 1/2 cup sugar
  • 1 1/2 teaspoons baking powder
  • 1/2 teaspoon baking soda
  • 1/4 teaspoon salt

2) Cut 6 tablespoons of chilled butter into 1/4 inch cubes, then cut into flour mixture

3) Add:

  • 1/2 cup buttermilk
  • 1 egg
  • 1 1/2 teaspoons vanilla extract
  • 1/2 cup cranberries
  • Zest and juice from one whole orange

4) Mix together until combined

5) Bake at 400 degrees for 10-12 minutes or until tops are lightly browned

6) Enjoy with a hot cup of coffee or tea!

Claire's Rolled Cookies

One of my favorite Christmas traditions from when I was a kid is decorating the cookies my mom would cut from rolled dough. We did it pretty much every year that I can remember. When my sister Amy and I were living together a few years ago (before we both got married), we even incorporated it into our holiday celebration with our girlfriends

So I was pumped when Amy told me we'd be decorating cookies during the 12 Days of Thanksgiving in Philly. You better believe it. One thing I didn't know is that the recipe came from one of our mom's oldest friends, a lady named Claire who was like a second mom to us growing up. I love those moments when baking something you've loved for your whole life collides with a history you never knew before. It made me even more excited to make the cookies. It felt more significant, somehow. 

If you want to try them yourself, here's the recipe:

Claire's Rolled Cookies 

2 cups flour

1 tsp baking powder

1/2 tsp salt

2/3 cup shortening or butter

1 cup sugar

1 egg

1 tsp vanilla

In a medium-sized bowl, mix together flour, baking powder, and salt.

In a large bowl, cream butter, then gradually add sugar until light and fluffy.

Add egg and vanilla.

Beat well, then add flour mixture.

Roll to 1/4" thickness on floured surface.

Bake on an ungreased cookie sheet at 375 degrees for about 10 minutes, or until edges are lightly browned.

Once your dough is ready, flour your surface and get ready to roll it out!

Cut your shapes as close together as possible.

Arrange them on an ungreased cookie sheet, then bake for about 10 minutes at 375.

Don't forget to add some red hots before baking!

Turn on your favorite Christmas tunes.

Let the cookies cool while you concoct the colored sugar glaze for decorating (1.5 tbsp water + 1.25 cups powdered sugar + food coloring).

Then get some friends together to create masterpieces and share in the joy of the season!